
How to Calibrate Your Car's ADAS After a Windshield Replacement: The Step Nobody Tells You About
Automotive Research, ASE Master Technicians & Fact-Checking
Direct Technical Summary
Comprehensive automotive research and technical breakdown for How to Calibrate Your Car's ADAS After a Windshield Replacement: The Step Nobody Tells You About.
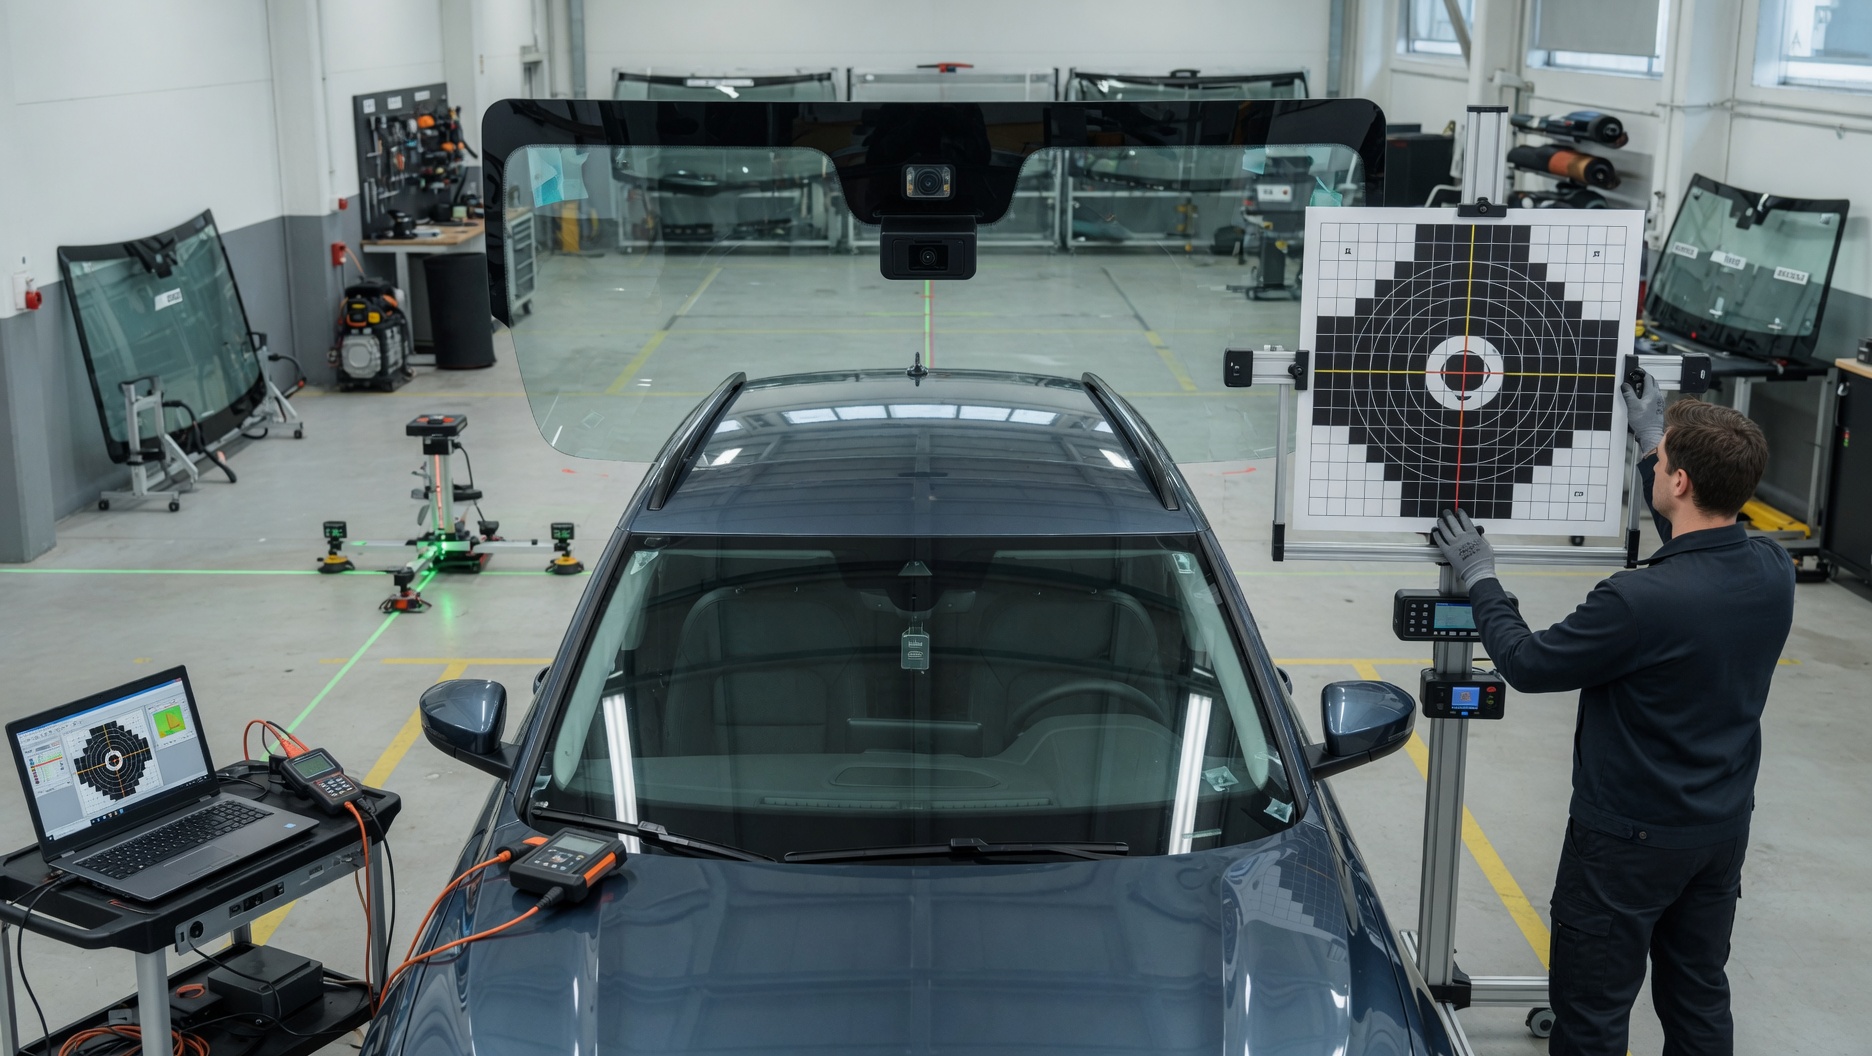
You just got your windshield replaced. The crack is gone, the glass looks perfect, and the shop handed you the keys with a smile. Everything seems fine — until your lane departure warning starts firing for no reason, your adaptive cruise control behaves erratically, or your automatic emergency braking throws a dashboard error on the highway.
What happened? The glass shop replaced the windshield but skipped the ADAS calibration. Or they attempted it with the wrong equipment. Or they did it in a parking lot when it required a controlled indoor environment. Any of these scenarios leaves you driving an SUV or car with safety systems that think straight ahead is two degrees to the left.
This is not a rare edge case. A 2023 study by AAA found that even a one-degree misalignment in a forward-facing camera can shift the system's detection zone by several feet at highway distances. At 60 mph, a lane departure warning calibrated one degree off-center could trigger a full second too late — or not trigger at all on the side that matters.
I have tracked this issue across dozens of vehicles and multiple brands over the past several years. The pattern is consistent: windshield replacements are routine, but the ADAS recalibration that should follow them is frequently skipped, performed incorrectly, or done with inadequate tools. The result is invisible. Your windshield looks great. Your safety systems look like they are working. But the calibration is off, and you will not know until the system fails to perform when you actually need it.
This guide covers every aspect of post-windshield ADAS calibration: what systems are affected, how calibration works at a technical level, what the process costs, which vehicles require which type of calibration, how to verify that the job was done correctly, and what to do if your shop skipped it entirely.
Every ADAS System That Relies on Your Windshield Camera
Most drivers think of the windshield as a piece of glass that keeps rain and bugs out. From an engineering perspective, the windshield on a modern vehicle is a precision-mounted optical surface that serves as the primary lens for a forward-facing camera system. That camera feeds data to nearly every driver assistance feature on your vehicle.
When the windshield is replaced, the camera is removed from its bracket, the old glass is cut out, the new glass is bonded in place, and the camera is remounted. Even if the technician is careful, the new glass may sit slightly differently — a fraction of a millimeter in thickness variation, a subtle change in the adhesive layer, or a minor shift in the camera bracket position. These tiny physical changes alter the camera's optical path, which means every system downstream of that camera is now working with slightly distorted input.
Here is what is actually connected to that single camera behind your rearview mirror:
What Actually Happens During the Calibration Process
Understanding the physical steps helps you evaluate whether your shop is doing the job properly. If you drop off your vehicle for a windshield replacement and the shop tells you ADAS calibration took 15 minutes, something is wrong. A proper static calibration typically takes 45 minutes to 2 hours depending on the vehicle, and that does not include the windshield replacement itself.
Step-by-Step Static Calibration Procedure
Step 1: Vehicle positioning.
The vehicle is driven onto a level surface in a controlled indoor space. Tire pressures are checked and adjusted to manufacturer specification. The steering wheel is centered and locked. Any cargo is removed. The fuel level is verified.
Step 2: Target setup.
The calibration target — a large board or frame with a specific printed pattern — is positioned at the manufacturer-specified distance from the vehicle. The target is aligned to the vehicle's centerline using laser alignment tools, plumb bobs, or a manufacturer-specific fixture system. The height of the target center is set according to the vehicle's specifications, usually measured from the floor to the center of the target pattern.
Step 3: Diagnostic connection.
A scan tool is connected to the vehicle's OBD-II port. The technician navigates to the ADAS calibration menu for the specific system being calibrated. On many vehicles, this requires manufacturer-specific software — not a generic scan tool.
Step 4: Calibration execution.
The scan tool commands the ADAS module to enter calibration mode. The camera captures images of the target pattern and compares them to its internal reference model. The system calculates any angular offset and adjusts its software parameters to compensate. This process may take several minutes per system, and some vehicles require separate calibration routines for different ADAS features.
Step 5: Verification.
After calibration completes, the scan tool reports whether the procedure passed or failed. A passed calibration means the system's reference points are within manufacturer tolerance. However, a "pass" result does not guarantee real-world accuracy — it only confirms that the system accepted the new parameters. This is why a post-calibration test drive is important.
Step 6: Test drive.
The technician takes the vehicle on a short drive to verify that lane keeping, adaptive cruise control, and forward collision warning behave normally. This step is frequently skipped at busy shops, which is a problem because some calibration errors only become apparent during actual driving.
The Equipment Problem
ADAS calibration requires specialized equipment, and the quality and compatibility of that equipment varies enormously across the aftermarket repair industry.
OEM-level tools (manufacturer-specific diagnostic systems) provide the most reliable results but are expensive. A single BMW ISTA diagnostic setup can cost $10,000 or more. Toyota's Techstream, Honda's HDS, and Subaru's SSM4 each have their own costs and licensing requirements.
Aftermarket multi-brand tools from companies like Autel, Hunter, and Bosch offer calibration capabilities across multiple manufacturers at a lower cost. These tools have improved significantly in recent years, and many produce results comparable to OEM tools when used correctly. However, they may not support every model year or every calibration routine, and their target fixtures may not match OEM specifications exactly.
Generic scan tools (the kind used for basic code reading and diagnostics) generally cannot perform ADAS calibration at all. If a shop is using a basic scan tool and claiming to calibrate your ADAS camera, they are not doing what they say they are doing.
How Much Does ADAS Calibration Cost After a Windshield Replacement?
ADAS calibration costs range from $150 to $500 for most mainstream vehicles and $300 to $800 or more for luxury and premium brands. These costs are separate from the windshield replacement itself, which is a source of significant frustration for vehicle owners who are not prepared for the additional expense.
Cost Breakdown by Calibration Type and Vehicle Category
| Calibration Type | Mainstream Brands | Premium/Luxury Brands | Notes |
|---|---|---|---|
| Static only | $150 – $350 | $300 – $600 | Most common for Toyota, Honda, Subaru, Hyundai |
| Dynamic only | $100 – $250 | $200 – $400 | Less labor-intensive but requires road time |
| Static + Dynamic | $250 – $500 | $400 – $800+ | Required by Volvo, some Audi/VW, some Ford models |
| Dealership calibration | $250 – $500 | $400 – $1,000+ | Most expensive but uses OEM tools and procedures |
Why Costs Vary So Much
The price difference between a $150 calibration and a $600 calibration comes down to three factors:
Equipment investment. Shops that purchased $30,000+ multi-brand calibration systems or maintain OEM diagnostic subscriptions need to recover those costs. Their calibrations tend to be more accurate and more thoroughly documented, but the price reflects the tooling.
Labor time. A proper static calibration takes 45 minutes to 2 hours. A shop charging $150 for a calibration that takes 15 minutes is either rushing the process, skipping steps, or using inadequate equipment. If the price seems too good, it probably is.
Facility requirements. Static calibration requires a level floor, controlled lighting, and enough space to position targets at the manufacturer-specified distance (often 10-15 feet in front of the vehicle). Shops that have invested in dedicated calibration bays with level floors and proper lighting charge accordingly. Shops performing calibration in a general service bay or parking lot may charge less, but the results are less reliable.
Does Insurance Cover ADAS Calibration?
In most cases, yes — if the calibration is performed as part of a windshield replacement claim. Comprehensive auto insurance policies that cover glass replacement generally cover ADAS calibration as a necessary part of the repair, since the vehicle cannot be returned to pre-damage condition without it.
However, there are complications:
Some policies have glass-only endorsements that may not explicitly include calibration costs. Review your policy language or call your insurance company before authorizing the work.
Some glass shops absorb the calibration cost to keep the total invoice within insurance limits, but then perform a minimal or incomplete calibration to save time. This looks good on paper but leaves you with a vehicle that may have improperly calibrated safety systems.
Some states have passed legislation requiring insurance companies to cover ADAS calibration when windshield replacement is covered. Florida, Arizona, and several other states have enacted or proposed such laws. Check your state's current requirements.
The Five Most Common Calibration Mistakes — And How Each One Puts You at Risk
After researching dozens of calibration failures and speaking with ADAS technicians across multiple shops, five recurring mistakes stand out. Each one can produce a calibration that appears to pass but leaves your safety systems compromised.
Performing Static Calibration on an Unlevel Surface
A floor slope of just 0.5 degrees can shift the camera's vertical reference enough to affect forward collision warning timing and adaptive cruise control distance tracking. Many shops perform calibrations in general service bays that were never designed to be precision-level surfaces.
The fix is simple but expensive: a dedicated calibration bay with a verified level floor. Some premium aftermarket calibration systems include floor-leveling compensation software, but this adds another variable that can mask underlying accuracy issues.
Using the Wrong Target Distance or Height
Every manufacturer specifies exact target placement dimensions. Toyota's specifications differ from Honda's, which differ from Subaru's. A shop that uses one generic setup for all brands is cutting corners.
I have seen cases where a shop calibrated a Subaru EyeSight system using Toyota target distances. The calibration completed and reported a pass. The lane keeping assist worked fine in normal driving. But the forward collision warning detection range was shifted by approximately 15 feet at highway speeds — a difference the owner would never notice until an emergency braking situation where those 15 feet determine whether the system stops in time.
Skipping the Pre-Calibration Scan
Before calibrating the camera, the technician should perform a full vehicle scan to check for existing ADAS fault codes. If there are pre-existing issues — a faulty radar sensor, a damaged wheel speed sensor, a stored alignment error — the camera calibration may complete but interact badly with these other system faults.
A pre-scan takes 5-10 minutes and can reveal problems that would otherwise be invisible. Shops that skip this step to save time risk performing a calibration that passes in isolation but fails in the real-world context of the vehicle's complete sensor suite.
Not Performing a Post-Calibration Test Drive
The calibration tool says "pass." The technician closes the hood and parks the vehicle. No test drive. This happens more often than it should, especially at high-volume glass shops where throughput matters more than verification.
A test drive does not need to be long — 5 to 10 miles on a road with clear lane markings is usually sufficient. The purpose is to confirm that lane keeping does not pull to one side, adaptive cruise control tracks the vehicle ahead correctly, and forward collision warning does not produce false alerts. Without this step, the first test drive is yours — and you may not realize something is wrong until a system fails to perform correctly.
Performing Calibration With Incorrect Tire Pressure or Non-Standard Wheels
Vehicle ride height affects the camera's vertical angle relative to the road. Tire pressure directly affects ride height. If the calibration is performed with underinflated tires or aftermarket wheels with a different offset, the camera's reference plane will be tilted relative to its actual operating position once the tires are corrected or the original wheels are reinstalled.
This is a subtle error that most drivers and technicians overlook. The calibration passes because the system does not know the tire pressure is wrong — it only knows what the camera sees at that moment. Once the pressures are corrected, the camera's reference shifts.
How to Verify That Your Calibration Was Done Correctly
You cannot verify ADAS calibration accuracy with consumer-level tools. But you can perform practical checks that will reveal the most common calibration errors.
The Lane Keeping Assist Test
Find a straight highway with clear lane markings on both sides. Set your speed to 40-50 mph and center yourself in the lane. Gently release steering pressure (keep your hands on the wheel but stop actively steering). If the lane keeping assist is calibrated correctly, the system should maintain your position near the center of the lane without pulling consistently to one side.
If the vehicle drifts steadily toward one lane marking and the system either does not correct or corrects toward the wrong side, the camera calibration is likely off. Before blaming the calibration, verify that your wheel alignment is within specification, since alignment issues can produce similar symptoms.
The Adaptive Cruise Control Test
On a highway with moderate traffic, engage adaptive cruise control and follow a vehicle in your lane at a comfortable distance. The system should track the vehicle ahead smoothly without sudden distance changes, unexplained braking, or loss of target. If the system repeatedly loses the vehicle ahead, brakes for vehicles in adjacent lanes, or shows erratic following distance, the camera may be tracking off-center.
The Traffic Sign Recognition Test
If your vehicle has traffic sign recognition, drive past several speed limit signs and check whether the system reads them correctly. A miscalibrated camera may consistently miss signs on one side of the road or misread sign values. This is a quick and easy check that many drivers overlook.
Documentation You Should Request From the Shop
Before leaving the shop after a windshield replacement that includes ADAS calibration, ask for:
- Calibration report printout showing the system name, calibration type (static/dynamic), result (pass/fail), and date
- Pre-scan report showing ADAS-related fault codes before calibration
- Post-scan report showing cleared codes and system status after calibration
- Target distance and height measurements used during static calibration
- Equipment identification — what calibration system was used (brand and model)
A reputable shop should be able to provide all of this without hesitation. If they cannot produce documentation, that is a significant red flag about the quality and completeness of the calibration.
Brand-Specific Calibration Quirks That Catch Shops Off Guard
Every manufacturer has calibration specifications that differ from the others. A shop that calibrates Toyota cameras all day may make assumptions when a Subaru or BMW rolls in. These brand-specific quirks are where many calibration errors originate.
Subaru EyeSight (Dual Stereo Camera)
Subaru's EyeSight system uses two cameras mounted at the top of the windshield, spaced approximately 14 inches apart. Both cameras must be calibrated together, and the inter-camera alignment must be precise because the system uses the parallax difference between the two images to calculate distance — the same principle as human depth perception.
EyeSight calibration requires two targets at different distances (approximately 2.0 and 5.5 meters). The procedure is strictly static and must be performed in a controlled indoor environment. Dynamic calibration is not accepted for EyeSight. Subaru is also one of the few manufacturers that requires a specific windshield glass specification — not all aftermarket windshields meet Subaru's optical clarity requirements for EyeSight functionality.
Toyota Safety Sense
Toyota specifies static calibration for most Toyota Safety Sense (TSS) equipped vehicles. The target distance is approximately 2.3 meters from the front bumper, measured to a specific reference point. Toyota's calibration is relatively straightforward compared to some brands, but the target positioning tolerance is tight — a few centimeters of error in distance or height can result in a calibration that passes but produces subtly inaccurate forward detection.
One common issue with Toyota calibrations: the system may appear to work normally after an incorrect calibration, with lane keeping and adaptive cruise control behaving acceptably in routine driving. The error only becomes apparent in edge cases — a pedestrian stepping off the curb at the edge of the detection zone, or a motorcycle partially obscured by a larger vehicle. These are exactly the scenarios where accurate calibration matters most.
BMW Forward Camera
BMW uses static calibration for its forward camera system, with target placement typically at 3.0 to 3.5 meters. The calibration must be performed using BMW ISTA diagnostic software or a compatible aftermarket tool with BMW-specific procedures. Generic calibration routines from multi-brand tools may not cover all BMW ADAS subsystems, which means some features may remain uncalibrated even after the primary camera calibration passes.
BMW vehicles with the optional Driving Assistant Professional package have additional calibration requirements for the front radar sensor, which is separate from the camera but works in conjunction with it. If the windshield replacement affects the radar sensor mounting (rare but possible on some models), both camera and radar must be calibrated.
Honda Sensing
Honda Sensing uses a monocular camera integrated into a housing behind the rearview mirror. Static calibration is required, with Honda-specific target specifications. One quirk that catches shops: Honda's calibration procedure requires the vehicle's headlights to be off during the process. Automatic headlights that turn on in indoor lighting can interfere with the target pattern recognition.
Honda also requires that the windshield replacement glass meet specific optical standards. Some aftermarket windshields marketed as "ADAS compatible" do not meet Honda's optical distortion specifications, which can cause calibration failures or post-calibration system instability even when the glass appears identical to OEM.
What to Do If Your Shop Skipped ADAS Calibration Entirely
If you have already had your windshield replaced and you suspect that ADAS calibration was not performed — or was performed incorrectly — here is a practical path forward.
Step 1: Check for Dashboard Warnings
Some vehicles will display an ADAS-related warning light or message if the camera system detects a significant calibration error. However, many calibration offsets are too small to trigger a warning but large enough to affect system performance. The absence of a warning light does not mean the calibration is correct.
Step 2: Perform the Lane Keeping and ACC Tests Described Above
If lane keeping pulls consistently to one side or adaptive cruise control behaves erratically, these are strong indicators of a calibration issue. Document the specific symptoms, including which direction the vehicle pulls and under what conditions the problems appear.
Step 3: Contact the Glass Shop
Ask the shop whether ADAS calibration was performed and request documentation. If they confirm it was done, ask for the calibration report, pre-scan, and post-scan. If they cannot provide documentation, or if they admit calibration was not performed, ask them to arrange it — either in-house if they have the equipment, or through a subcontracted ADAS calibration service.
Step 4: Visit a Dealership or Certified ADAS Calibration Shop
If the glass shop cannot resolve the issue or if you want a higher level of confidence, take the vehicle to the manufacturer dealership or an independent shop with OEM-level calibration equipment. Explain that the windshield was recently replaced and that you want a full ADAS camera calibration with documentation.
Step 5: Keep All Receipts and Documentation
If the original glass shop failed to perform or properly complete ADAS calibration, and you need to pay for it separately, keep all documentation. Depending on your state's consumer protection laws and your insurance policy, you may be able to recover the cost from the glass shop or your insurance company.
Questions Drivers Actually Ask About ADAS Calibration
Do I need ADAS calibration every time I replace my windshield?
Yes, if your vehicle has a forward-facing camera mounted on or behind the windshield. This applies to the vast majority of vehicles manufactured since 2017, and many models dating back to 2015. The camera's optical path changes when the glass is replaced, and recalibration is the only way to restore accurate system performance. There is no shortcut and no alternative.
Can I drive safely without ADAS calibration after a windshield replacement?
Your vehicle will still drive and steer normally without calibration. The risk is that your driver assistance systems — forward collision warning, automatic emergency braking, lane keeping, adaptive cruise control — may not perform accurately. In routine driving, you might not notice anything wrong. In an emergency, the difference between a properly calibrated system and a miscalibrated one could be a matter of feet and fractions of seconds.
How long does ADAS calibration take?
Static calibration typically takes 45 minutes to 2 hours, including vehicle preparation and target setup. Dynamic calibration requires a 20-40 minute drive at highway speeds. If your vehicle requires both, expect the total process to take 2 to 3 hours after the windshield replacement is complete.
Will my vehicle tell me if the camera needs calibration?
Sometimes. Some vehicles display a warning message or fault code when the camera detects a significant alignment error. But many small calibration offsets do not trigger any warning at all. The system simply operates with slightly incorrect reference data, which may only become apparent during specific driving situations — or during a critical safety event.
Can I calibrate my own ADAS camera?
Not practically. ADAS calibration requires manufacturer-specific diagnostic software, precision targets, controlled environmental conditions, and technical knowledge of the calibration procedures for your specific vehicle. This is not a DIY maintenance task like changing oil or replacing brake pads. The equipment alone costs thousands of dollars, and the margin for error is extremely small.
My glass shop says they handle ADAS calibration in-house. How do I know if they are doing it correctly?
Ask three questions: What calibration equipment do you use? Do you perform static, dynamic, or both? Can you provide a printed calibration report showing pass/fail results? A reputable shop should answer all three confidently and provide documentation without hesitation. If they seem unsure about the calibration type your vehicle requires, or if they cannot produce a printed report, consider having the calibration performed elsewhere.
Does aftermarket windshield glass affect ADAS calibration?
It can. OEM windshield glass is manufactured to specific optical standards that ensure the camera behind it receives an undistorted image. Some aftermarket windshields meet these standards; others do not. Subaru and Honda are particularly sensitive to glass quality — Subaru's EyeSight system has been documented to malfunction with certain aftermarket windshields even after successful calibration. If your vehicle uses a stereo camera system or you experience persistent calibration failures, OEM glass may be necessary.
I replaced my windshield six months ago and nobody mentioned calibration. Is it too late?
It is never too late to calibrate. The camera does not degrade further after the windshield replacement — the miscalibration that exists immediately after the glass swap is the same miscalibration that exists six months later. Schedule a calibration as soon as possible. In the meantime, do not rely on your ADAS systems as if they are functioning accurately.
ADAS Calibration Is Not Optional — It Is Part of the Repair
The automotive glass industry is still catching up to the reality that windshield replacement is no longer just a glass job. On vehicles built in the last decade, it is an integrated repair that involves precision optics, electronic calibration, and safety system verification. A windshield replacement without ADAS calibration is, by definition, an incomplete repair.
The most frustrating part of this entire issue is that it is invisible. A poorly calibrated camera does not make noise. It does not trigger a warning light. It does not change how the vehicle drives in normal conditions. It just sits there, quietly providing slightly wrong data to systems that are designed to protect you in the moments that matter most.
If you are scheduling a windshield replacement, ask about ADAS calibration before the work begins. Get a written estimate that includes calibration costs. Confirm what type of calibration your vehicle requires. And when the job is done, ask for documentation proving the calibration was completed and passed.
If your windshield was already replaced and calibration was never discussed, go get it done. The cost is a fraction of what your ADAS-equipped windshield replacement cost in the first place, and the safety systems on your vehicle are only as good as the calibration behind them.
A Few Important Cautions
The calibration procedures, target specifications, and system requirements described in this article reflect general industry practices and publicly available manufacturer documentation as of late 2025. Specific procedures vary by manufacturer, model, model year, and installed equipment. Always follow the calibration requirements specified in your vehicle's service manual or by the manufacturer's technical documentation.
ADAS calibration should only be performed by technicians trained in the specific procedures for your vehicle, using equipment that meets manufacturer specifications. Incorrect calibration can compromise safety system performance in ways that are not immediately apparent during normal driving.
This article is for general informational purposes and does not constitute professional automotive repair advice. If you have concerns about your vehicle's ADAS calibration status, consult a qualified technician or your vehicle's manufacturer dealership.
References
- AAA Foundation for Traffic Safety — ADAS Calibration Research
- National Highway Traffic Safety Administration — Vehicle Safety Complaints and Recalls
- Society of Automotive Engineers — SAE J3063: Forward-Looking Camera Standard
- Auto Glass Safety Council — ADAS Recalibration Position Statement
- Subaru of America — EyeSight System Technical Information
- Toyota USA — Toyota Safety Sense Documentation
- BMW USA — BMW Driver Assistance Systems
- Honda USA — Honda Sensing Technical Documentation
Researching this vehicle or comparing used inventory?
Always cross-reference factory service bulletins, verify warranty coverage, and compare dealer financing rates or insurance quotes before purchasing.
Reader Feedback
Was this technical guide helpful?
Your verification vote informs our ongoing automotive research schedule.